
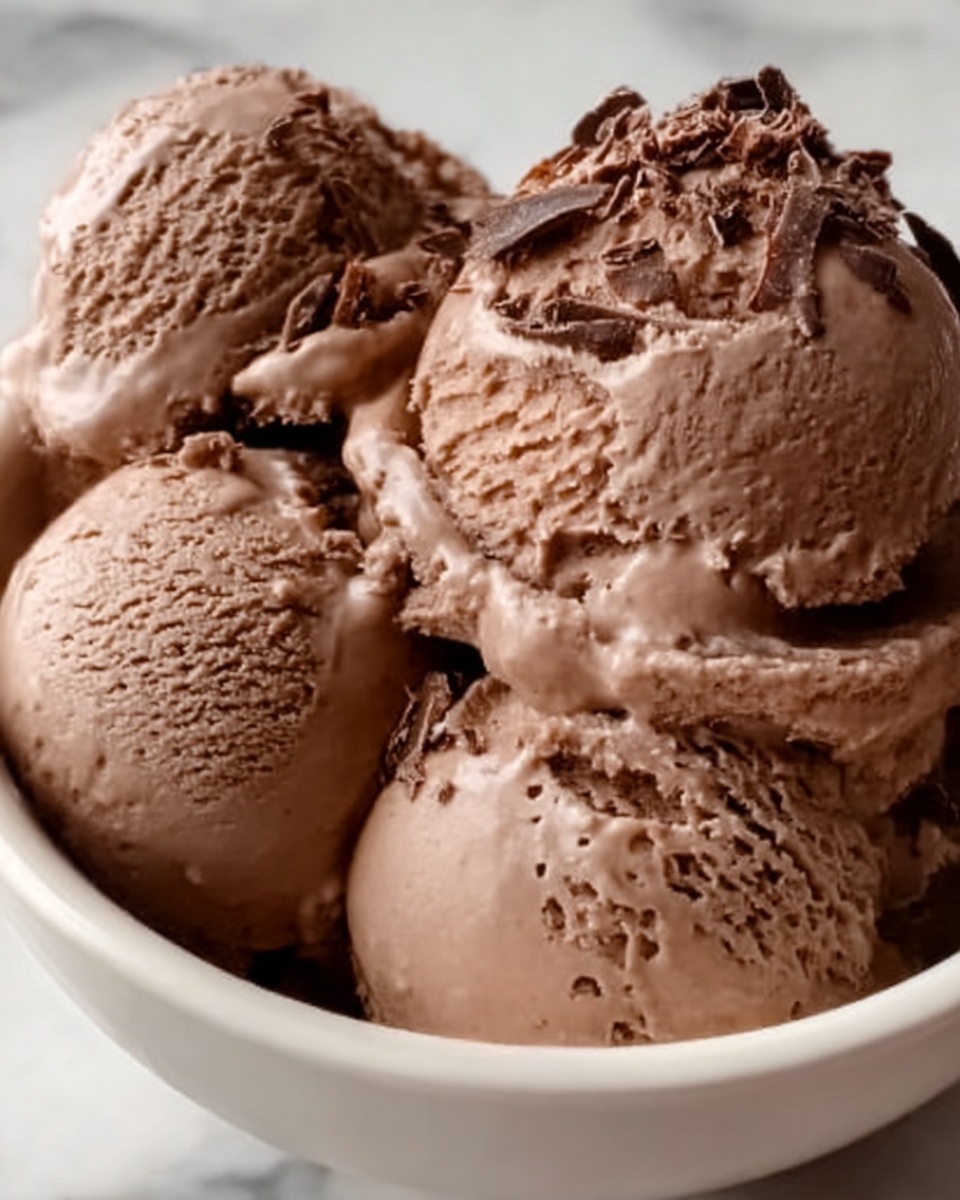
Nothing beats the joy of indulging in a rich, velvety dessert on a warm day, and this Creamy Frozen Chocolate Ice Cream Recipe delivers just that with every spoonful. From the first bite, you’ll taste the deep, luscious chocolate flavor balanced perfectly with a smooth, creamy texture that melts in your mouth. It’s a decadent homemade treat that’s surprisingly simple to make yet feels like a luxurious escape, ideal for sharing with family or savoring all by yourself.
Ingredients You’ll Need
These ingredients are straightforward but essential to crafting the perfect balance of richness and silkiness in your ice cream. Each one plays a crucial role — whether it’s the cream for that luscious mouthfeel, cocoa for chocolate intensity, or vanilla for a subtle, aromatic lift.
- 2 cups heavy cream: Provides the creamy, velvety base that makes the ice cream so indulgent.
- 1 cup whole milk: Lightens the texture just enough without losing richness.
- 3/4 cup granulated sugar: Sweetens while balancing the bitterness of the cocoa.
- 1/2 cup unsweetened cocoa powder: Delivers deep chocolate flavor and beautiful dark color.
- 4 oz semi-sweet or dark chocolate, finely chopped: Adds an intense, melted chocolate richness.
- 1 teaspoon vanilla extract: Enhances the chocolate notes with a warm, fragrant touch.
- Pinch of salt: Perfectly rounds out the sweetness and intensifies flavors.
How to Make Creamy Frozen Chocolate Ice Cream Recipe
Step 1: Combine Dry Ingredients
Start by whisking together the sugar, cocoa powder, and salt in a medium saucepan. This dry mix allows the cocoa and sugar to evenly distribute before adding the liquids, setting the stage for that signature smooth chocolate taste.
Step 2: Heat with Milk
Next, stir in the whole milk and place the saucepan over medium heat. Keep stirring as it warms up, making sure the cocoa and sugar dissolve fully. Take care not to let the mixture boil — you’re aiming for a hot, silky liquid that’s perfectly infused with chocolate flavor.
Step 3: Melt the Chocolate
Remove the pan from heat and add the finely chopped semi-sweet or dark chocolate. Stir until the chocolate melts completely into the warm mixture, creating a glossy, decadent chocolate base that is the hallmark of this recipe.
Step 4: Incorporate Cream and Vanilla
Now, pour in the heavy cream and vanilla extract. Stir gently until everything combines into a smooth, luscious mixture that promises a creamy texture and an inviting aroma.
Step 5: Chill Thoroughly
Cover your bowl and chill the chocolate mixture in the refrigerator for at least 2 to 4 hours. Better yet, leave it overnight – this step not only thickens the mix but also deepens the flavors, preparing it perfectly for churning.
Step 6: Churn Your Ice Cream
Once nicely chilled, pour the mixture into your ice cream maker. Follow the manufacturer’s instructions, usually about 20 to 25 minutes, and watch as the mixture transforms into a soft, creamy frozen delight.
Step 7: Freeze to Set
Transfer your churned ice cream to an airtight container and freeze it for at least 2 hours. This final freeze step firms it up so every scoop has that perfect creamy yet solid texture you expect from top-notch ice cream.
Step 8: Serve and Enjoy!
Scoop it out and indulge in the fruit of your labor — wonderfully creamy, deeply chocolatey frozen ice cream that’s absolutely irresistible.
How to Serve Creamy Frozen Chocolate Ice Cream Recipe

Garnishes
Elevate your ice cream experience by adding toppings like fresh berries, a drizzle of caramel or chocolate sauce, or even a sprinkle of toasted nuts for crunch. Each garnish adds a unique contrast to the smooth richness of the ice cream.
Side Dishes
This Creamy Frozen Chocolate Ice Cream Recipe pairs wonderfully with warm desserts like brownies, molten lava cake, or a freshly baked chocolate chip cookie. The warm and cold sensations create a delightful sensory experience every time.
Creative Ways to Present
Why stick to plain scoops? Serve your ice cream in waffle cones for classic charm, layer it between cookie sandwiches, or use it as a decadent topping for a milkshake. Let your imagination run wild and make each serving special.
Make Ahead and Storage
Storing Leftovers
If you have any leftovers, store them in an airtight container in your freezer to preserve freshness and prevent ice crystals from forming. This creaminess will hold up beautifully for several days, ready for another indulgent treat.
Freezing
Freeze your ice cream in a shallow container to help it freeze evenly and thaw more consistently when ready to eat. Remember to cover the surface with a piece of parchment paper or plastic wrap before sealing the container for best results.
Reheating
Since this is a frozen dessert, reheating is not recommended. Instead, simply let any overly firm ice cream sit at room temperature for a few minutes to soften slightly, making scooping easier and retaining that luscious texture.
FAQs
Can I make this recipe without an ice cream maker?
Definitely! While an ice cream maker gives the creamiest result, you can also freeze the mixture in a shallow container, stirring vigorously every 30 minutes to break up ice crystals. It takes more attention but still yields delicious ice cream.
What kind of chocolate works best?
Semi-sweet or dark chocolate with at least 60% cacao is ideal. It provides balanced bitterness and richness without overwhelming sweetness, enhancing the deep chocolate flavor in this recipe.
Can I use low-fat milk or cream?
Using whole milk and heavy cream is key to achieving the creamy texture that makes this recipe special. Lower-fat alternatives may result in a less smooth, icy texture.
How long can I store this ice cream in the freezer?
Stored properly in an airtight container, your homemade ice cream can last up to two weeks. Beyond that, flavor and texture may decline, so enjoy it sooner for maximum deliciousness.
Is there a way to make this recipe vegan or dairy-free?
Yes! Substitute the dairy with full-fat coconut milk and cream alternatives, and use dairy-free chocolate. Keep in mind the texture might differ slightly, but the ice cream will still be creamy and chocolatey.
Final Thoughts
This Creamy Frozen Chocolate Ice Cream Recipe is truly a must-try for chocolate lovers looking for an easy yet impressive homemade dessert. Once you taste the smooth texture and rich chocolate flavor, you’ll find yourself reaching for the spoon again and again. Trust me, making this at home will turn any day into a special celebration of joy and indulgence.
Print
Creamy Frozen Chocolate Ice Cream Recipe
- Prep Time: 15 minutes
- Cook Time: 10 minutes
- Total Time: 4 hours 25 minutes
- Yield: 6 servings
- Category: Dessert
- Method: Churning
- Cuisine: American
Description
This creamy frozen chocolate ice cream recipe offers a rich, velvety texture with the perfect balance of chocolatey sweetness. Made from simple ingredients like heavy cream, whole milk, cocoa powder, and real dark chocolate, it is churned in an ice cream maker to create a smooth and luscious frozen dessert that’s ideal for satisfying chocolate cravings at home.
Ingredients
Ice Cream Base
- 2 cups heavy cream
- 1 cup whole milk
- 3/4 cup granulated sugar
- 1/2 cup unsweetened cocoa powder
- 4 oz semi-sweet or dark chocolate, finely chopped
- 1 teaspoon vanilla extract
- Pinch of salt
Instructions
- Combine Dry Ingredients: In a medium saucepan, whisk together the granulated sugar, unsweetened cocoa powder, and a pinch of salt to evenly distribute the dry ingredients and prevent lumps.
- Heat Milk Mixture: Stir in the whole milk and place the saucepan over medium heat. Cook while stirring constantly until the mixture becomes hot and the cocoa powder and sugar are fully dissolved, being careful not to let it boil to preserve smoothness.
- Melt Chocolate: Remove the saucepan from heat and add the finely chopped semi-sweet or dark chocolate. Stir continuously until the chocolate is completely melted and the mixture is smooth.
- Add Cream and Vanilla: Stir in the heavy cream and vanilla extract until fully combined, creating a rich and flavorful ice cream base.
- Chill the Mixture: Cover the mixture and refrigerate for at least 2–4 hours, or preferably overnight, to ensure it is thoroughly chilled for optimal churning results.
- Churn the Ice Cream: Once chilled, pour the mixture into an ice cream maker and churn according to the manufacturer’s instructions, which usually takes about 20–25 minutes. This process aerates the ice cream, giving it a creamy texture.
- Freeze to Firm Up: Transfer the churned ice cream to an airtight container and freeze for at least 2 hours to allow it to firm up to a scoopable consistency.
- Serve and Enjoy: Scoop the creamy frozen chocolate ice cream into bowls or cones and enjoy the rich, homemade treat.
Notes
- For an even richer flavor, use dark chocolate with at least 60% cocoa content.
- Make sure to chill the ice cream base thoroughly before churning to improve texture.
- If you don’t have an ice cream maker, you can place the mixture in the freezer and stir vigorously every 30 minutes until firm to reduce ice crystals.
- Store leftover ice cream in an airtight container to prevent freezer burn.


